Part 1 of this story worked through design and carcase construction. Part 2 covered doors and drawers. Now we’re ready to construct the tops and shelves.
 If you are building this desk as a built-in, sandwiching the desktop between two walls, then the top is the trickiest part of this project because you will have to scribe it to three walls, which can be humbling. But read on and take heart, as I will show you how to do it.
 Create templates for your left and right walls. Hold a piece of 1/4″ plywood or other scrap material in the corner and create a template by scribing the shape of the wall onto the piece while holding the back edge firmly in place against the back wall.

 Cut out your template. Carefully cut to the line using a scroll saw, band saw or jig saw.
 Transfer lines to your top and cut. Cut one end, then measure distance to opposite corner, trace the wall contour to that side, and cut the top to shape. Test fit top in place and make any adjustments necessary to fit the opening.
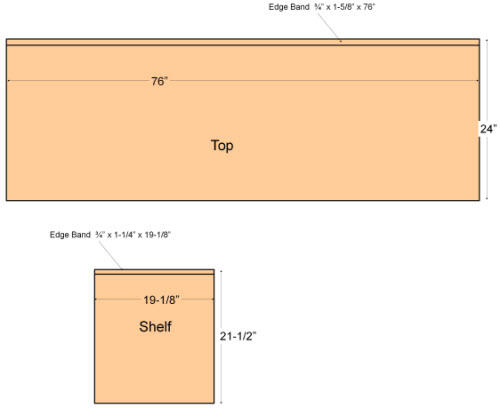
Cut shelves to size out of plywood. Leave 1/8″ in each direction so that you can install, remove or adjust the shelves easily.
 Edge band top and shelves. Glue liberally and clamp, forcing alignment along the entire span. This is much quicker than using biscuits for alignment, and looks better than shooting brads into the edge banding. The edge banding adds strength and minimizes sagging over the years. Take your time and force the edge band flush with the top of the plywood, and this will save you lots of sanding.
 Scrape or sand edge band flush. Take your time and be sure there is no ridge at any point along the joint. Round over the edge if you would like.
Top and Shelves

Photos By Author
More is this project:
Office in a Closet Part 1: Built-In Desk
Office in a Closet Part 2: Drawers and Doors
Office in a Closet Part 4: Finishing and Installing
Sorry for the erroneous link.
Hey George, Can you try again to get the details of that keepsake box out of hiding? Looks like something I might like to make for Christmas.