 This is the second installment of a four-part series on squeezing A LOT of desk into a small spot. In Part 1 Paul took us through design considerations and carcase construction.
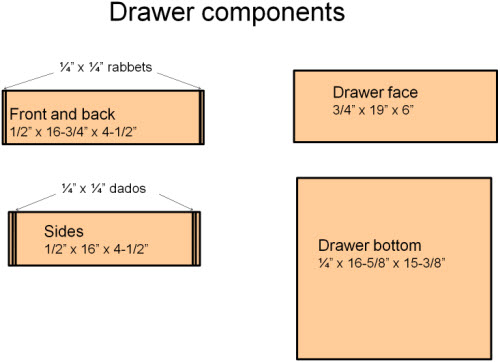 The case is ready for drawer and doors. There are nearly an infinite number of methods for building drawers. Here I used a full overlay drawer with a locking rabbet joint, as it is more than strong enough for this purpose and simple to set up and execute. I also used a false drawer face, as this makes drawer construction and installation more forgiving.
 Cut all pieces to size. Check the cutlist for dimensions, but again, adjust these for your specific design. This is a good time to “measure twice and cut once”, as you need to take into account the length and depth of dados, tenons, etc., and it is a pain when you build your drawers the wrong size. Trust me; I know a guy who has done it.
 Set up dado blade. The setup here is simple. You want a 1/4″ dado, and a 1/4″ gap between the dado blade and fence. Take your time, test on scrap and get this right because it will be used on all of your drawer components.
 Mill dados to receive drawer bottom. Lay all pieces flat, with the inside facing down and the bottom against the fence, and mill the dados.
 Mill dados on drawer sides. These require a dado milled into the inside face of each drawer side. Lay the drawer size flat on the saw with the inside face down, placing the edge of the drawer side against the fence as you push it slowly through the cut. Place a backer board behind your workpiece if you experience tearout.
 Mill rabbets on drawer front and back. To do this, hold the work piece vertically against the fence. Hold it firmly, keeping your fingers safely out of the way, and push it slowly through the cut. It is a good idea to use a featherboard for this operation.
 Cut drawer bottom. Dry fit all pieces and measure for the drawer bottom out of 1/4″ MDF core plywood since it is manufactured to a full 1/4″ thickness which makes it a perfect fit for a 1/4″ dado. Normal veneer core plywood requires an undersized dado which can’t be done with a dado blade.
 Assemble drawers. Apply glue to all joints. With plywood bottoms there is no reason to let the bottom float, so I put glue in the drawer bottom dadoes as well.
 Measure diagonals to check for square. If the diagonal measurements are square, your drawer is square and you can go ahead and clamp it up. If not, adjust as needed by using clamping pressure, and then clamp it to hold everything in place for a couple hours while the glue dries.
 Stress test your drawers (I accept NO responsibility if you really do this). If you built your drawers right and used high quality materials, they will hold up to some serious abuse. For some reason it never gets old for me, so I have stood on every drawer I have ever built. They will never have to deal with this much strain again!
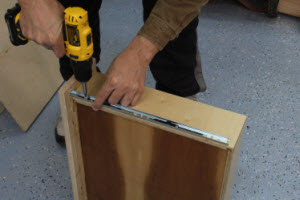 Install drawer hardware according to the instructions. Temporarily install the drawer hardware at this point, and test to ensure that everything fits properly.
 Cut and attach drawer fronts. Measure drawer opening and size the drawer front so that you have a 3/8″ overlap in all directions. Apply glue around the perimeter of the drawer face, and use double faced tape or hot glue to hold the drawer in position, and slide the drawer out. I put a couple clamps to hold the drawer face in place while I drove a few brads into it from inside the drawer. Then remove the hardware for finishing.
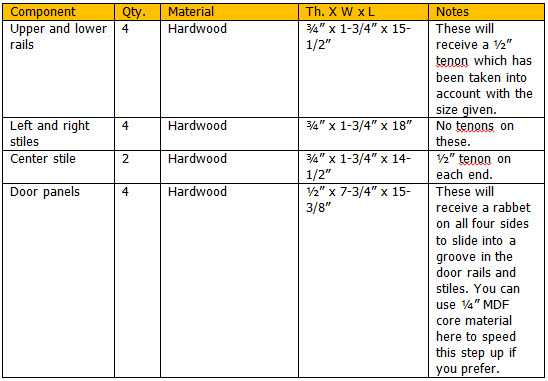
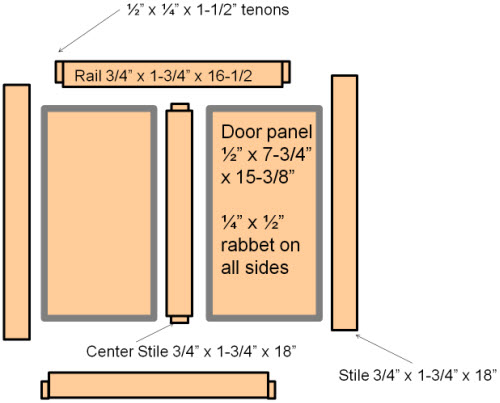 Let’s turn our attention to the doors. As with drawers, there are also many ways to make doors. I prefer simple, non-ornate doors, with flat panels rather than raised panels. Normally I use 1/4″ MDF core plywood for panel inserts because they are easy to work with and save time, but when I got to this step in the project I realized that I was out of MDF and my supplier was closed for the night, so I built the panels out of solid maple. For extra strength, I milled the panels to 1/2″ thick, and cut a rabbet on each edge to fit into the 1/4″ dado in the door rails and stiles. This additional thickness adds a nice heft to the door design, and ensures a good match of the panel to the rails and stiles.I had originally designed the doors to be a simple frame and single panel, but when I looked at the dimensions of the door I didn’t like the horizontal proportions. I didn’t want to build the cabinets to be narrower because I will use them to house printers, scanners and potentially other large devices. So I simply added an additional vertical stile to each door, and it changed it from a single horizontal panel to a pair of vertical ones, which made me happier.Cut pieces to size for rails (horizontal) and stiles (vertical). Allow for a 3/8″ tenon on each end of each rail.
 Mill dados to receive door panels. Use your saw blade and test on a scrap piece of the same thickness as your rails and stiles. Place one face against the fence and run through the blade. Then put the other face against the face and make another cut. This will center your dado perfectly on the piece. Once you get the width of cut to correctly produce a centered 1/4″ groove, run all rails and stiles through.
 Mill tenons. Measure width of the dados in the rails and stiles, and set the height of your blade to remove the appropriate amount of stock to create a tenon of appropriate thickness. Test on scrap first, and when the tenon fits snugly in the dado, run all of the rails and one stile through. You could use a dado for this as well, but I chose to just use my saw blade and nibble away the material in this case.
 Resaw or plane door panel stock to 1/2″ thickness. For flat panel doors, you can leave the stock 1/2″ thick so that the panel will retain greater strength and stability compared to a 1/4″ thick panel.
 Mill door panels. Dry assemble your rails and stiles, and measure for the panel size. Allow 1/8″ wiggle room to allow for imperfections and seasonal movement. Set up your dado blade to 1/4″ height and 1/2″ width, and configure a sacrificial fence so that you can run your dado blade right next to the fence. Test your setup on a piece of scrap, run it through, and test fit in the door members. Once it is set, run all the pieces through.
 Glue up doors. If you are staining the project, you might consider pre-finishing the door panels so that that you don’t have unstained portions appearing due to seasonal wood movement. Clamp carefully and ensure that everything is aligned. Put glue on each tenon, but avoid getting it on the edges of the panel. You want the outer edges of the panels to “float” unbound in the frames, so that they can expand and contract freely. If you use plywood or MDF for your panels, feel free to glue the panels in place.
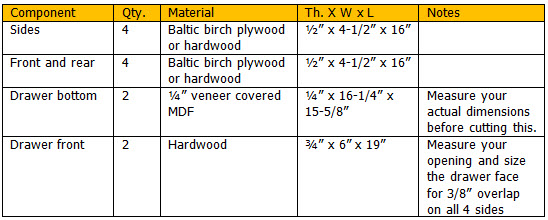 Drawers
 Doors
Doors
 Next time: Making the shelves and desk top.
Photos By Author
More is this project:
Office in a Closet Part 1: Built-In Desk
Office in a Closet Part 3: Build and Install the Desktop
Office in a Closet Part 4: Finishing and Installing
Share tips, start a discussion or ask other students a question. If you have a question for the instructor, please click here.
Already a member? Sign in
No Responses to “Office in a Closet Part 2: Drawers and Doors”