If you own a router table, you have what it takes to create perfect edges for glue up. And thanks to carbide cutters, a router table can joint the edges of abrasive man-made materials like MDF and particleboard, something that can’t be done on most jointers (those with steel knives) without ruining the cutters.
Woodworkers quickly learn that a table saw does not leave an edge that’s ready for gluing. Saw marks and slight irregularities from hand feeding the stock add up to unsightly glue lines. That’s when a woodworker’s desire turns to jointers. But what if a jointer has yet to make its way off the wish list and into the shop? Take heart, there is hope for the jointer-less. It’s your router table to the rescue.

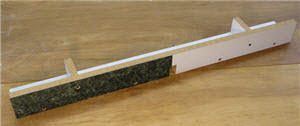
Photo 1. A simple shop-made fence is all you need to edge joint on a router table. Glue a strip of plastic laminate on the out feed side of the fence to act as an offset. The thickness of the laminate determines the amount of material removed in each pass.
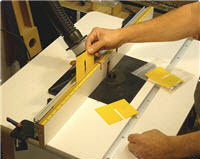
Photo 2. Some commercial fences include shim stock to create an offset on the out feed fence. Shims allow you to adjust the depth of cut taken on each pass.
There are a number of suitable carbide straight cutters for jointing on the router table. In general, use the shortest, stockiest bit possible. Tall skinny bits are more prone to chatter. Large diameter bits work best because their greater mass and higher rim speed help them produce a smoother cut. Be sure to use a 1/2″ shank for stock over 3/8″ thick. Long straight cutters can be used to joint stock over 2″ thick. A sharp bit and a slow feed rate will reduce the risk of chatter with these bits. My favorite bit for jointing is a 1/2″ diameter spiral cutter. It gives the best results in stock under 1-1/4″ thick. These bits aren’t cheap, but they produce an amazingly smooth edge with little or no tear-out, even on squirrely-grained woods. For a little less money, you can pick up a 1-1/2″ diameter straight cutter that also does a nice job. Even a regular straight bit will work.

Photo 3. With the router unplugged, use a square and a 1/2

Photo 4. Set the fence so the out feed half is even with the cutting edge of the bit. First, eyeball the fence and clamp one end. The hold a straight edge against the out feed side and swing the fence until the straight edge contacts the cutter. (see inset) The cutter should just kiss the straight edge.

Photo 4 Inset. Swing the fence until the straight edge contacts the cutter.

Photo 5. Make a test cut. Snipe at the end of the cut indicates that you're removing too much material. Adjust the fence to remove less material and take another cut. If the stock bumps into the out feed fence, then the cut is too shallow.

Photo 6. Mark the joint with a triangle that points away from you. This will help you keep track of the face side of each board and which edge to joint.

Photo 7. A slow and steady feed rate works best. Keel the stock tight against the fence throughout the cut. For the best fitting joint, feed on board face down and the next board face up.

Photo 8. The result is a perfect joint that's easy to assemble and invisible to the eye.
Photos By Author
images show as broken. Can't see how to square table to bit.
Great article. I'm planning to joint 1 1/8" thick sapele boards on the router table, with a 1/2" diameter up-cut spiral bit. Thinking of taking it in 3 passes per board, 1/3 ascending bit depth per pass, to limit chatter, tear-out risk, etc - thoughts on that? Or would you take the whole joint in one pass?
Good Day David; I have just purchased a JessEm router table top. My Rockler router fence, does not fit on this table. The table is wider than the bracket clamp slots on the fence. I need to secure the fence to the table top. Is it possible to drill, or cut slots in the phenolic table top material to make T slots for the fence to be secured to the top? Or do you have another suggestion? The JessEm table and Router Fence clamp and secure onto each other on the side and from underneath. Suggestions welcome. If i can drill, router or cut through the material, what bit would you suggest Thanks Allan Peacock dapplecorp@hotmail.ca 604 807 0880
I don't have anything as big as 1 1/2" diameter in my bit collection. the closest thing I have is a CMT 3/4" x 1 1/2" flush trim bit. It's pretty husky - will it work for this purpose?
do you use an up or down spiral bit?
Despite a cautious set up!, and although the edges appear smooth and straight they don't match up. They constantly have a gap towards the middle of the boards. Initially though was I need to make additional passes but despite doing that, I still ended up with a 3/16 gap in the middle of the boards. Can't move forward to squaring the other edge with the table saw until this is resolved. Boards are approximately 65 Inches long and and vary in width 7-9 inches wide and eventually want to join them to make a 19 inch wide 63 inch piece of maple to be turned into a breakfast island for the nephew. Hoping to avoid making another jig for the table saw which would be a long one to accommodate the length of these boards. Any suggestion or thoughts would be truly appreciated Sincerely Jon K.