We've all heard the horror stories about someone who's gotten maimed using a table saw. The story always goes the same way, first is what happened, and then, unfortunately, what the operator did wrong. I'm convinced that all of these accidents were preventable. I implore you to use caution and do everything you can to protect yourself in your shop.
Table saws are inherently dangerous and you should give them ample respect. I understand that accidents happen, but you can do a lot to minimize the chances of being the victim of a table saw accident by using a guard and splitter, and common sense. You should know that OSHA defines what I call a guard as a blade cover. I choose to continue calling these guards since they block or impede a person's hands from contact with the rotating saw blade.
Most new table saws today come with good guards and good splitters with anti-kickback pawls. Pawls are spring loaded backward pointing "fingers" that stop a board from being shot forward during a kickback. Riving knives are fairly common on new saws, but that wasn't the case just a few years ago. A "true" riving knife is a splitter that is articulated to move up and down as the saw blade is raised or lowered. It maintains close proximity to the blade at all times. This offers more protection by stopping a saw kerf from closing sooner than with a traditional splitter. Here's a great video that explains riving knives:
George Vondriska Explains Riving KnivesPlease realize this is not a review of different factory or aftermarket table saw guards and splitters, rather it's intended to explore options, give you ideas, and encourage you to find a solution that works for you and gives you proper protection. First I'll show you my guard and splitter solution, then I'll show you some of what I found when I searched the Internet for aftermarket saw guards and splitters.
My Shop-Made Guard And Splitter Story
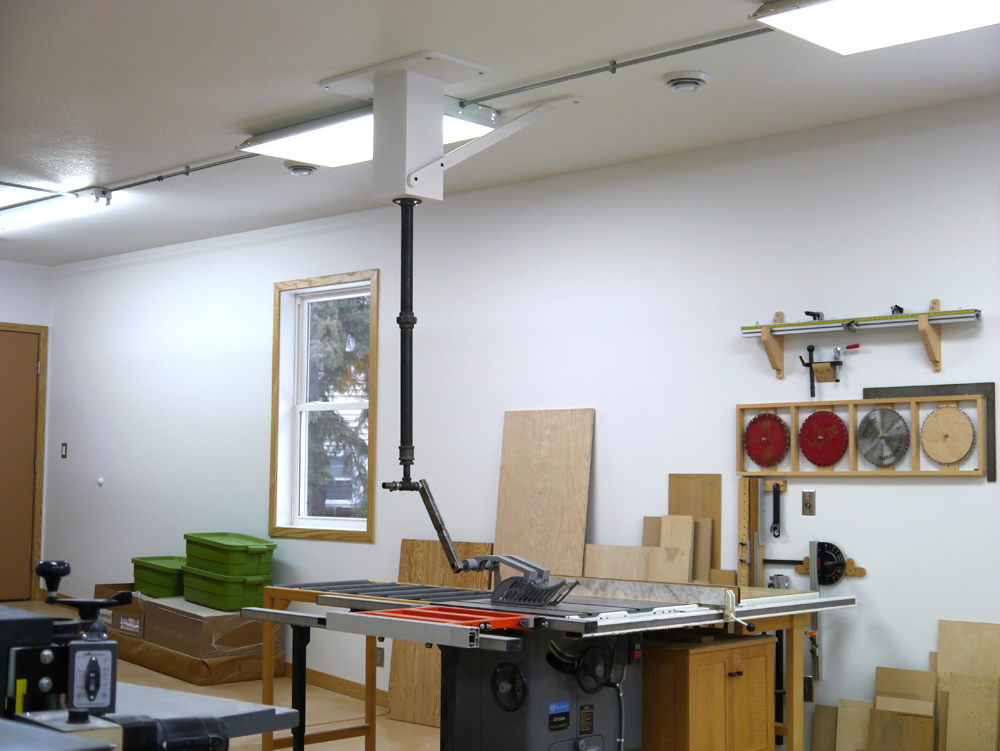
Basically this is my story of how I got from there to where I am today with my saw safety thinking. My table saw is a 1980's vintage Delta Unisaw that I bought new. I added Delta's Uniguard overarm guard that wrapped around the left rear of the saw. That configuration is not typical, most wrap around from the right. It's design presented sawing limitations to the left of the blade. Making those cuts required I drop the Uniguard out of the way, and that made me very nervous, and rightfully so.
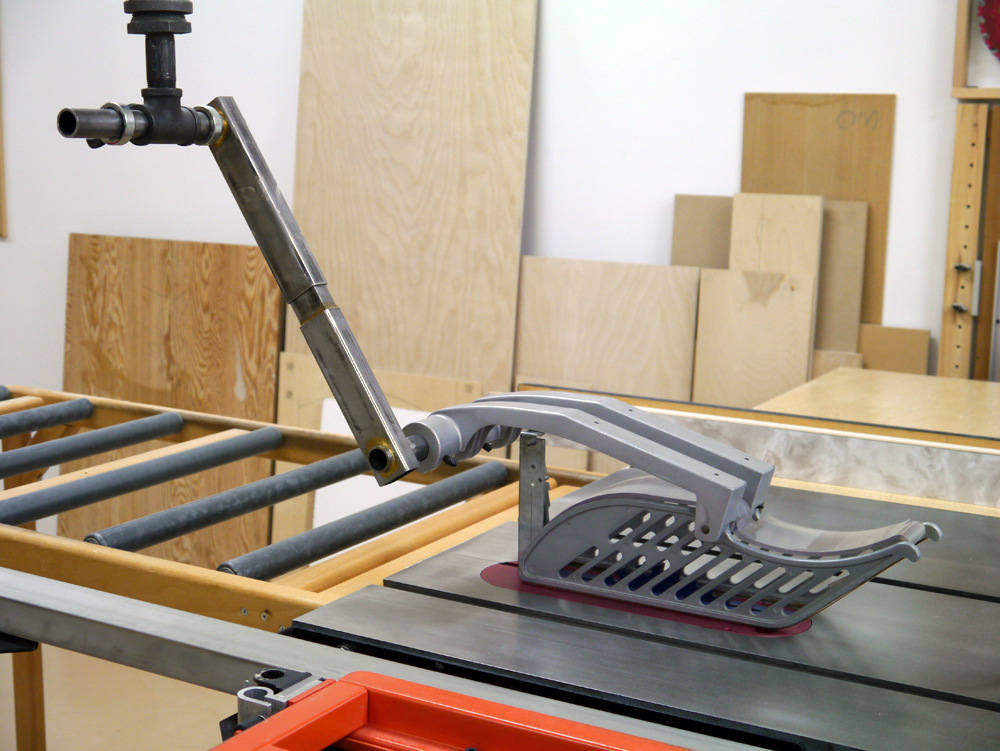
Adding an aftermarket sliding crosscut table to my table saw forced me to eliminate the Uniguard due to interference with the sliding table. My saw is affixed to my floor and it doesn't move; so a permanently mounted ceiling overhead guard made a lot of sense. Using the Uniguard blade cover parts together with black plumbing pipe and fittings, rectangular and round metal tubing, and miscellaneous hardware I crafted the ceiling mounted guard you see here.
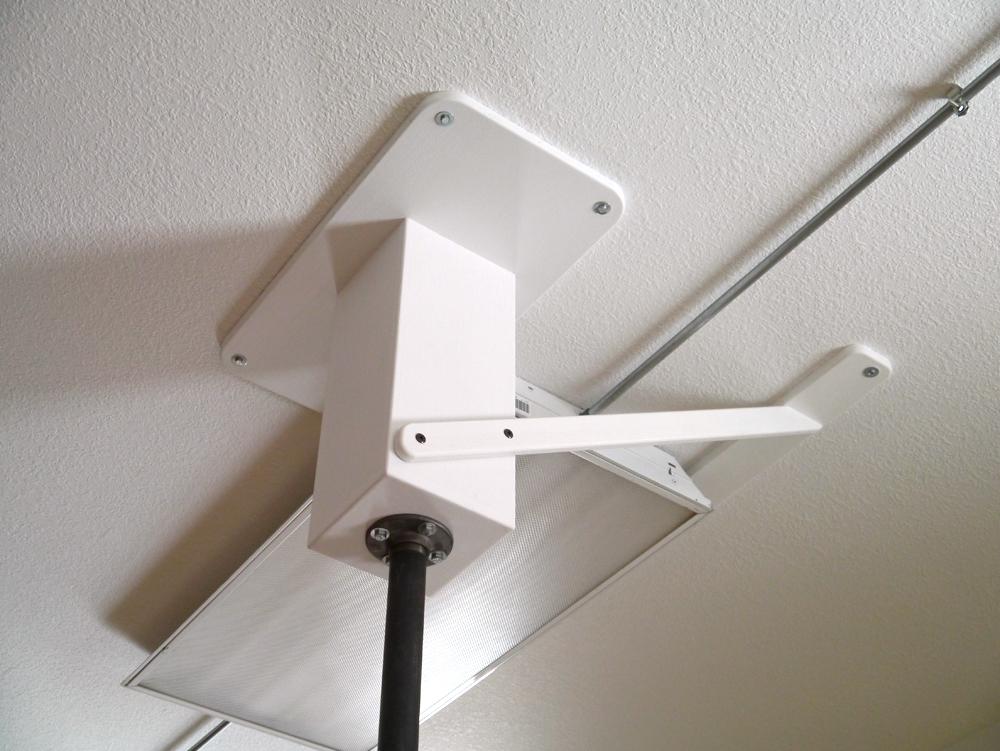
I tried a few different ways to connect the guard support pipe to my ceiling before I arrived at this final solution. The problem was that a long section of pipe with a small footprint connection to the ceiling was too flexible. So I made this 2-ft long extension box, which shortened the pipe length and increased the ceiling connection surface area. It works well.
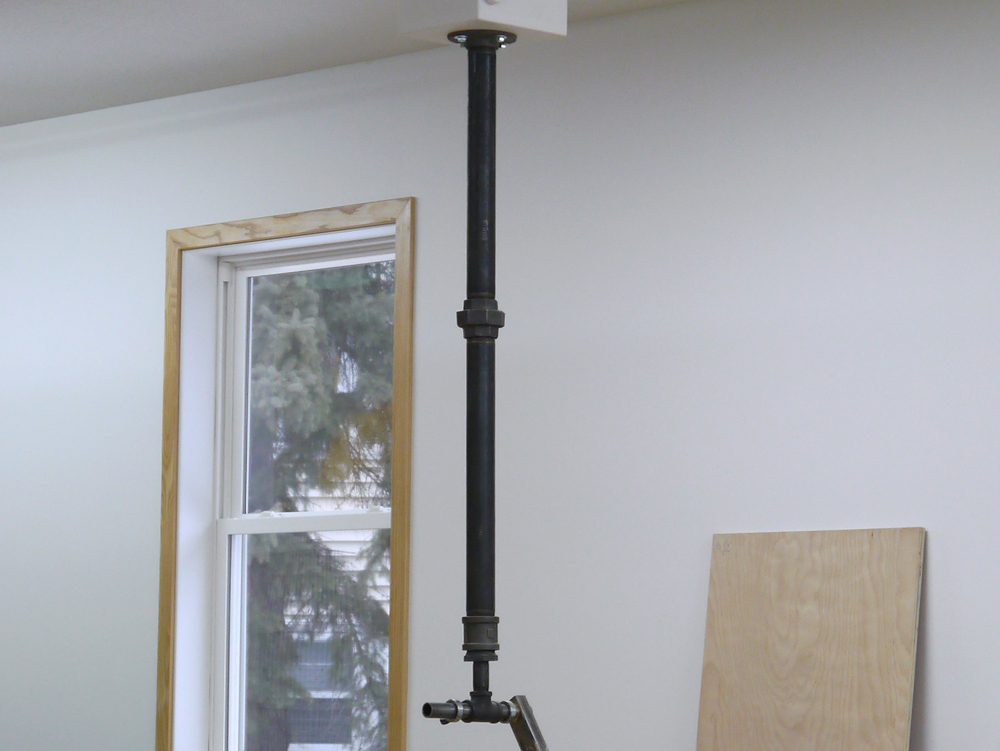
I split the pipe into two sections and joined those sections with a pipe union. That allows me to easily remove the lower section that holds the guard so there's clearance for the rare times I need to cut extra long or wide work pieces oriented vertically.
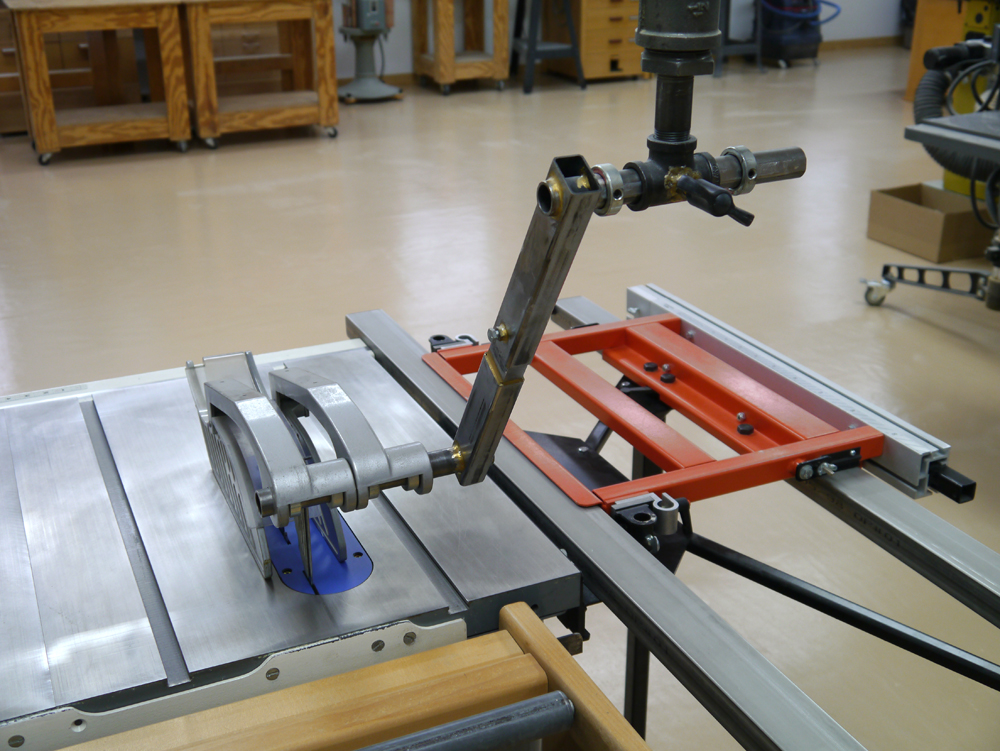
Here are a few of my guard's construction details: The upper pivot arm lets me pivot the entire guard up and out of the way so I can make cuts on tall pieces up to about 24" without needing to separate the guard at the pipe union. The lower pivot arm allows me to pivot the blade cover out of the way for blade changes or when I need to retract the independent splitter.

The upper pivot arm tube fits nicely inside a black pipe tee fitting. A hole is drilled in the tee, a nut is brazed over the hole, and then a threaded knob is screwed into the nut. The tube and guard can be shifted left or right for flexibility when sawing narrow work-pieces, or when using my sliding table attachment. I filed a flat spot on the tube for greater locking force, and as a locking reference point. The shaft collars are added to restrict the side-to-side movement of the blade cover so it never accidentally touches the saw blade.
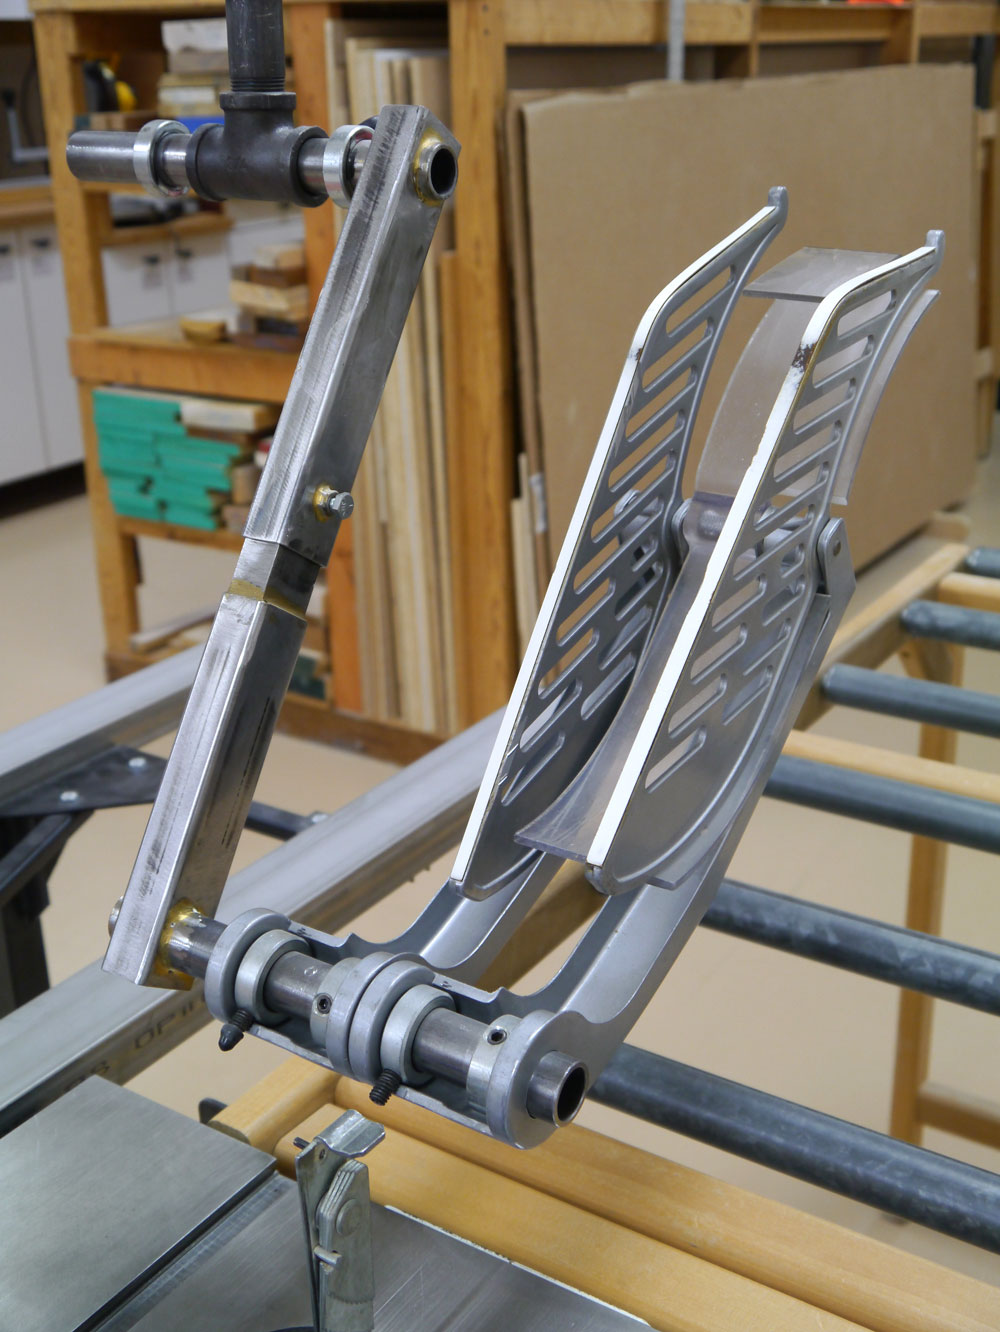
The guard's blade cover arms, side shields, and shaft collars were the only parts salvaged from the original Uniguard. These are essential components that could be purchased today as replacements parts. The arms and shields are "hinged" so the bottoms of the shields always rest flat on the workpieces being sawn. The interlocking support arm rectangular tubing is length adjustable. That, and all the other adjustable features of the guard allow it to be fine-tuned as needed when conditions change over time.
Aftermarket Overarm & Overhead Guards
My opinion is that overarm guards (covers), or overhead guards are the best. I'm referring to guards that are mounted separately from the saw's splitter. They offer the most flexibility and the most coverage so most saw cuts can be made with the blade guard in place. Combined with a good splitter, and a keen awareness of your saw, your environment, and the materials you are cutting, and you should be well protected.
The guards shown here range in price from $200 to $500. I consider that cheap insurance, and peanuts compared to a trip to the hand surgeon.
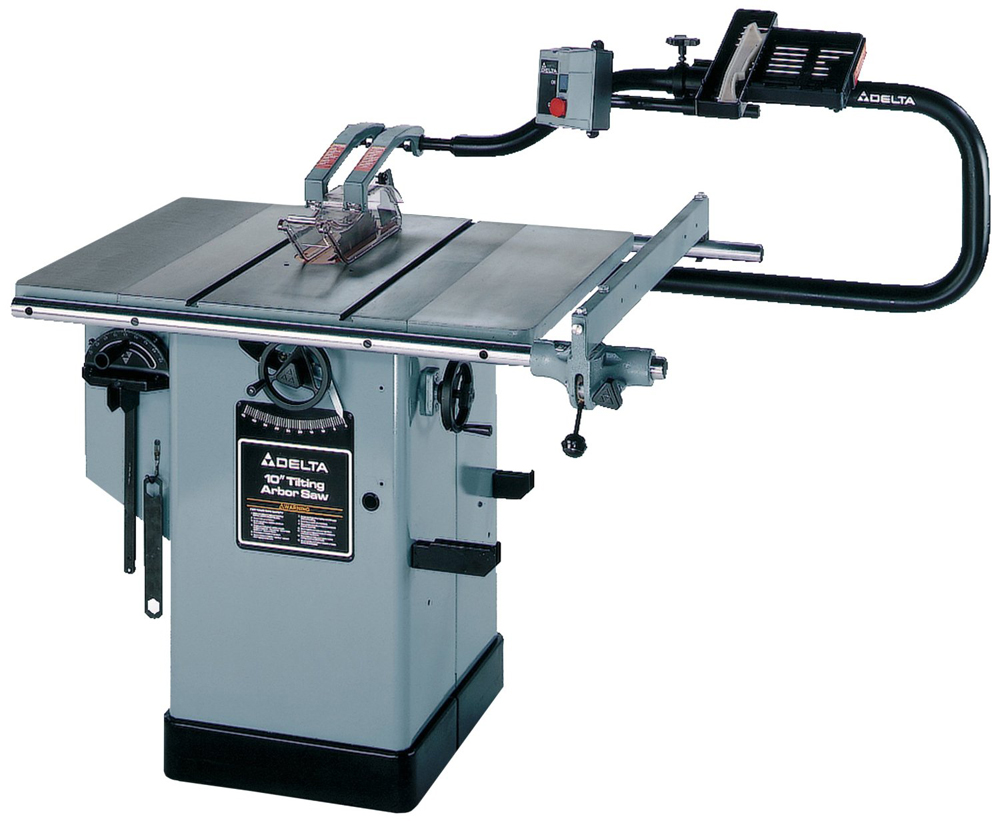
This is the modern version of the Uniguard overarm guard that I purchased for my Unisaw way back in the day. It's right mounted and includes a splitter with anti-kickback pawls. The overarm assembly can, most likely, be adapted to a variety of saws, but the splitter will probably only work with Delta saws.
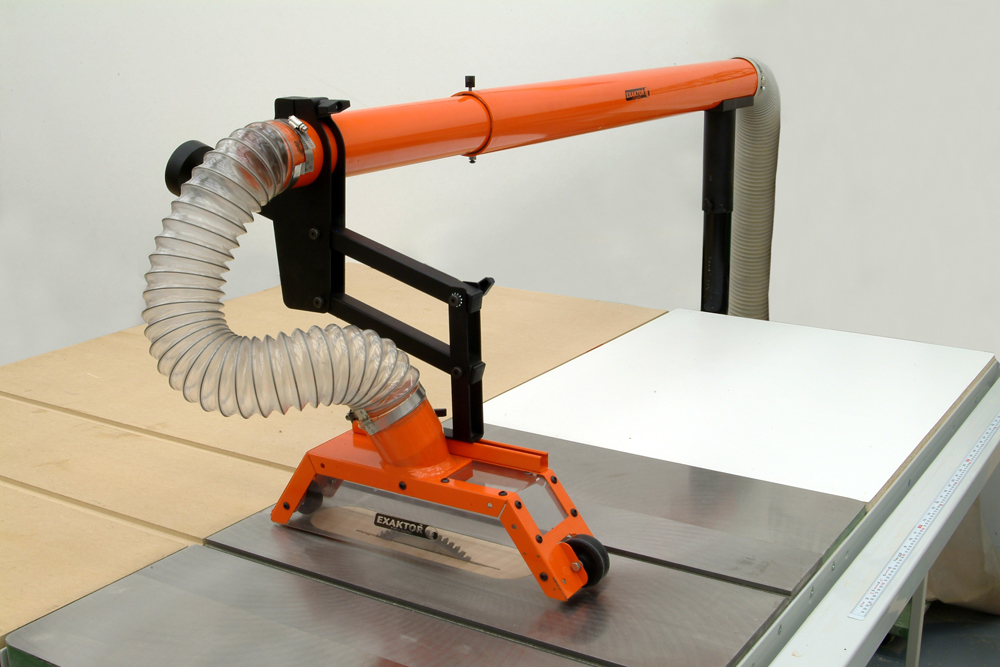
This overarm guard is made by Exaktor. Its large diameter telescoping tube doubles as a dust collector pipe. Most guards of this style do not include a splitter. See the splitter options shown below.
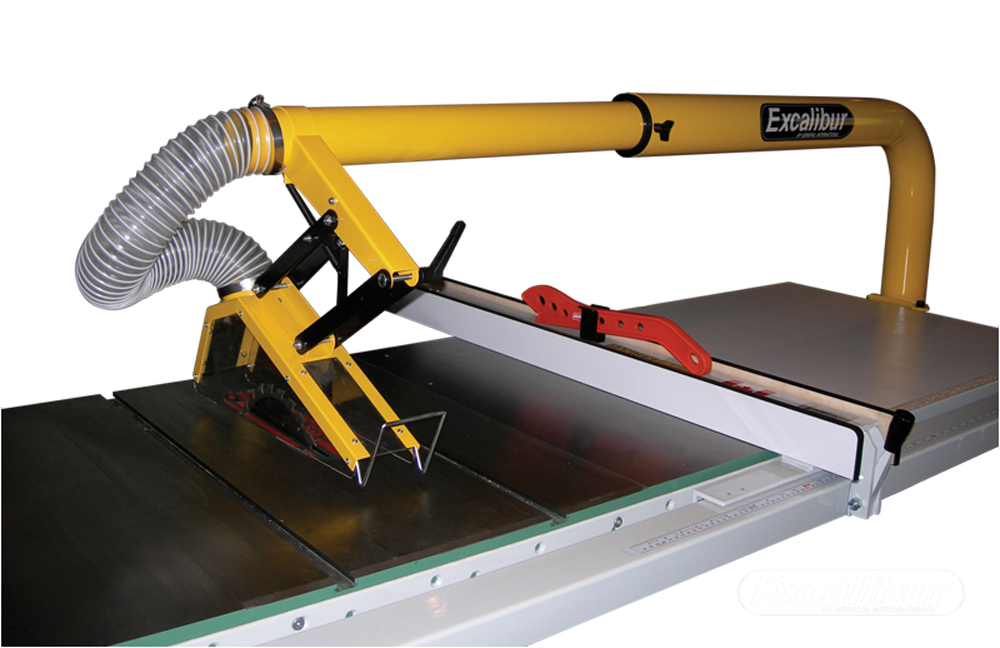
Here's a similar design made by Excalibur.
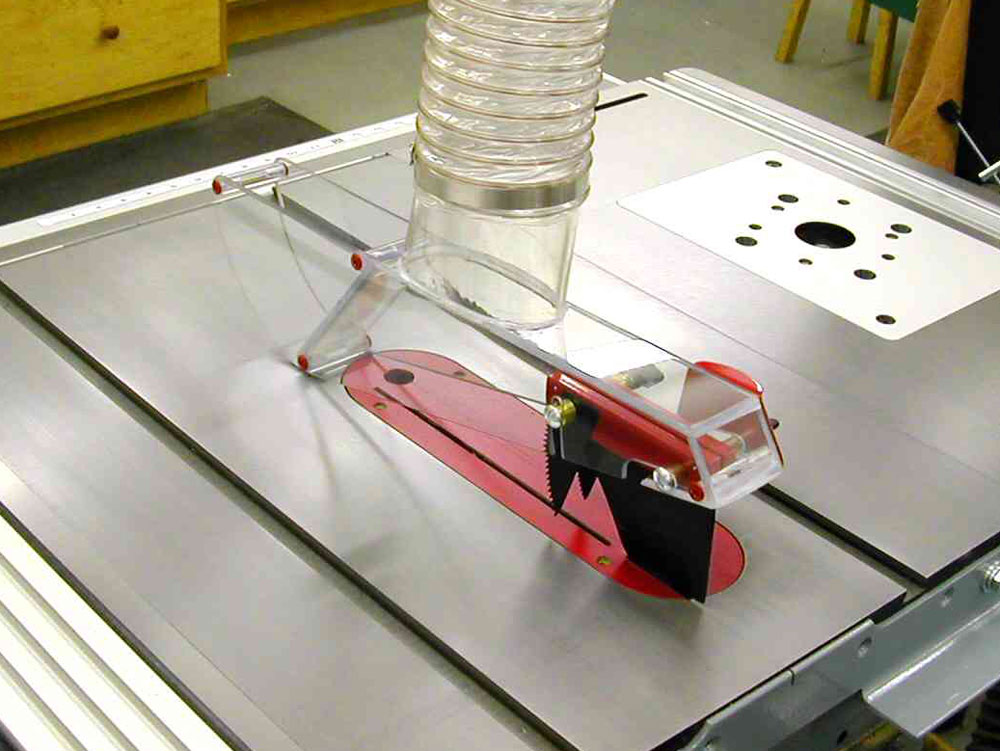
This highly popular blade cover and splitter combination is hand made by Lee Styron of Leeway Workshop, LLC. Although I prefer a two-piece setup, this is a great option for anyone who cannot live with the bulk of an overarm guard, or has a mobile saw where a ceiling mount setup won't work. It's also great for anyone who has a limited need for cutting dados and grooves. Lee is very backlogged because he personally manufactures these products; keep that in mind if you want to order any of his products.
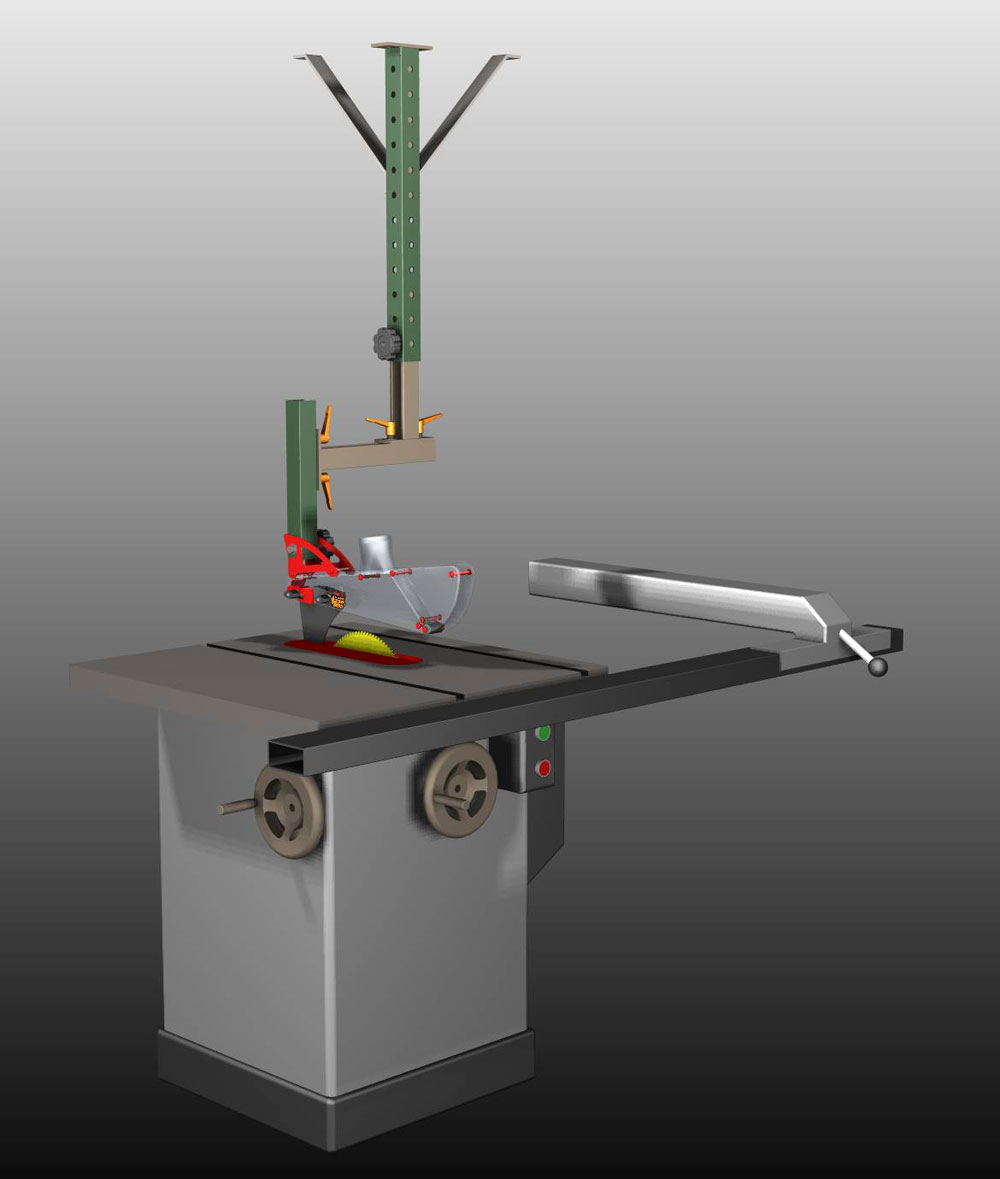
Leeway Workshop also offers the Shark Guard blade cover with an overhead bracket so it can be combined with any ceiling mount system.
My Saw's Splitter
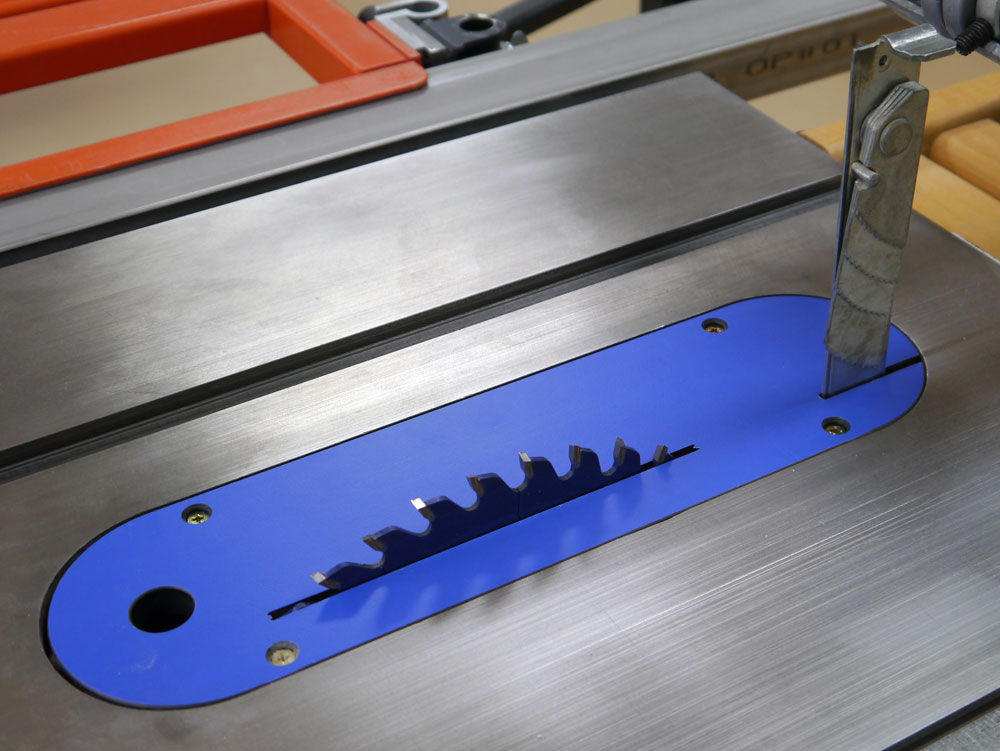
This is the splitter that came with my Unisaw. It's served me well for all these years. I love that it's independent from the blade guard cover. The combination of the two offers great flexibility and provides the safety and protection I want and need. It easily retracts to be hidden under the saw's throat plate when it must be out of the way for dado and groove cuts.
Aftermarket Splitters
There's not a lot to choose from as far as aftermarket table saw splitters. Probably because most saws today come with them included, and more and more saws today come with a riving knife. The aftermarket splitters shown here are either universal or custom fit to a particular saw. Check the manufacture's site for saw compatibility information.

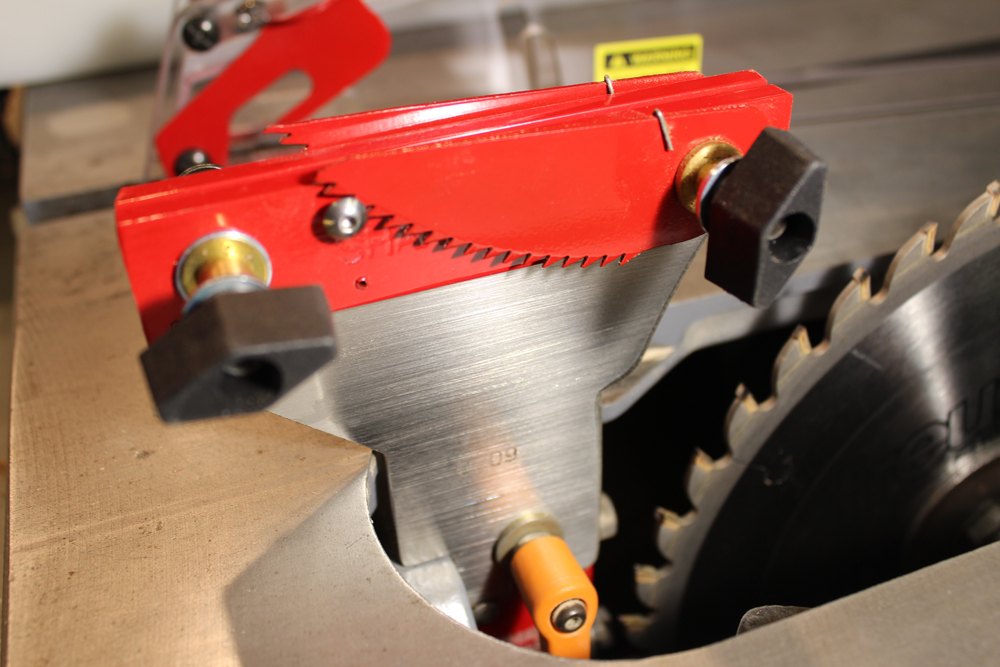
The above two photos show a removable splitter with pawls is made by Leeway Workshop, LLC.

This Micro Jig Splitter™ SteelPRO System is relatively inexpensive and very simple. It mounts directly to a saw's factory or aftermarket throat plate.
Related Topics:
Miter Saw Safety Tips
Band Saw Safety Tips
Table Saw Safety Tips
Table Saw Safety for Beginner Woodworking
Table Saw Safety
Band Saw, Router Table and Table Saw Safety
12 Tips for Using a Router Safely
Sources:
Delta Machinery
UNIGUARD® Blade Guard, 34-976
General International
Excalibur Overarm Blade Cover System, 50-EXBC
Exaktor Tools Limited
Overarm Blade Cover/Dust Collector, EX0A-2
Leeway Workshop, LLC.
Saw guards and splitters
www.thesharkguard.com
Rockler
Table saw guards and Micro Jig splitters
(800) 279-4441

Images are now missing
We have ongoing resistance in our shop to using guards. Currently the guards are set up to appease the safety manager, however they are counter balanced and offer no resistance at all - a light tough of a finger will allow the guard to rise up. Is there an optimal amount of resistance that will allow materials to flow while also offering protection?
[…] feature, the Delta does not disappoint. It also features a tool-free split guard to ensure the riving knife rises and falls smoothly […]
I have a new delta saw ,there are 4 screws to adjust riving knife, I cannot seem to adjust the knife accurately. Which way do the screws turn to adjust the top and bottom of the knife?
I have been using the micro jig setup for years. The only issue I have ever had was the jig to drill the holes for it some ends up too close to the blade. But I have used them regularly. Today after reading this section I looked seriously at the shark system. (Link above) After some consideration and the fact that I do not have a hood type dust collector on my Craftsman Hybrid table saw, I ordered the Shark split-er with all the bells and whistles. It will be 8 weeks before I get it but I am looking forward to a hood with a dust port on it. Most of my work is in Hardwood and I have been trying to figure out a way to control the chips that come from the upper side of the table. This saw has a 4" dust port on the back that is always connected to my 2 stage dust collector. But with the zero clearance inserts I end up with a lot of chips and dust on the floor.
The splitter I favor is the Micro Jig. Its dirt simple. I have several throat plates for my Ridgid TS3650. Two employ the Micro Jig splitters, one for thin kerf and one for the full size 1/8" blade. Roger Klein
Thanks for all those links.