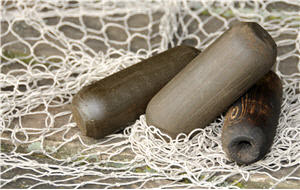
Photo 1. Circa 1900 net float used on Lake Superior.
One hundred years ago, the north shore of Lake Superior was overrun with fisherman throwing out large nets and pulling up lake herring by the ton. These rugged men lived a hard life, pulling in their nets from the great lake. Now and then, one of the nets broke loose and the floats that held the net up, (Photo 1), were set adrift-to be collected later as they washed ashore.
I now hold one of those floats in my hand, and with the guidance of a seasoned carver, instructor Bruce Futterer, I will bring out that fishermen’s face and bring the wood spirit to life.
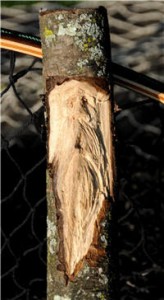
Photo 2. Carved into a piece of dry oak, my first attempt at carving turned out much better than I expected.
It was just eight weeks ago I attempted my first wood carving projects, (Photo 2), after reading a couple books and browsing a few carving magazines. My initial inspiration for woodcarving was to be able to carve a wood spirit into the top of a few walking sticks for my family and be able to have some kind of woodworking that I could bring with me out camping that didn’t require power or large tools.
My first attempt at carving was from a branch I picked up while tossing wood into our campfire. I followed the directions in one of the books I had found and spent three hours picking at the branch trying to release the wood spirit within. Looking back, it may have been much easier if I had known how to strop the edge of my carving tools to keep that extra sharp edge and had I not picked a piece of dry oak. I figured oak was good for the rest of my woodworking, why not my carving? Man, was I green.
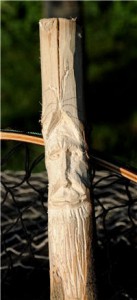
Photo 3. My second carving, followed the book the best I could. It was another small step forward byt still lacked sharp edges & depth.
My second carving was done a few days later, (Photo 3). It took that long for me to realize the first one wasn’t nearly as good as I thought. I have to thank my wife and family for smiling and telling my how good the carvings were or I may not have tried again. My second face was a little better, held a few more details, and again took 3 hours of picking and blowing out chips. This time, I picked a piece of wood better suited for a cutting board-maple-not much improvement here in carvability.

Photo 4. My third carving, done with instruction and a few sharpening tips, was a vast improvement. My carving in basswood with sharp tools things really took shape.
Not having a lot of free time to dedicate to years of self-teaching, I decided I needed help. So I signed up for my first carving class, packed the car with my tent, and headed north to get some accelerated learning at the North House Folk School on the north shore of Lake Superior in Grand Marais, Minnesota.
My first day was great. The intoxicating smell of the north shore combined with the rustic setting of the North House Folk School, was very energizing. I couldn’t wait to get started.
The first morning I walked over to the school, having camped right next door. I entered a fantastic timber framed shop where we all sat down as our instructor passed out some brown basswood ‘bobbers’. After 8 hours of picking and blowing, I had managed, with a lot of guidance, to carve a face, (Photo 4). Of course Bruce was able to knock off that same face in 6 minutes. I wasn’t sure if this was discouraging or motivational.
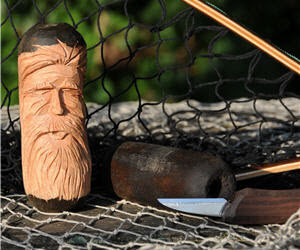
Photo 5. Here's my fourth carving. After a day of instruction I was able to cut my time down from 6 hours to 90 minutes on the carving in my herring net a float.
After class, I went back to my campsite and made some more chips. What had taken me 8 hours that day now took me only 90 minutes, producing my third ever carving, (Photo 5). I was starting to think there was some hope.
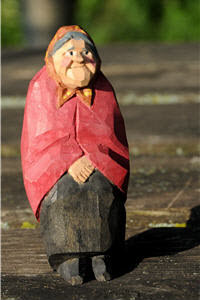
Photo 6. My fifth carving was a carving of Lena, a Scandinavian figure carving.
On days 2 and 3, we stepped it up a bit and carved full flat-plane style figures. Again, Bruce would start the class by carving the entire figure in 15 minutes so we could see all the cuts he made. I still think he was just showing off. We then commenced to spend the next eight hours trying to imitate these skills. After a full day of Ole and Lena jokes and a few semi-mandatory coffee breaks, I managed to carve and paint my first Lena, (Photo 6).
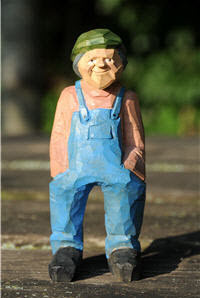
Photo 7. My sixth carving, also a Scandinavian figure carving, was a mate to Lena. Ole was a much bigger challenge for me. One wrong move and he would have had one ear shorter than the other and no nose.
Day three, it was time to carve a mate for Lena so we started in on Ole, (Photo 7). With the additional body parts, this was a bit more challenging to carve, but after a day of jokes, breaks, and some guidance from Bruce to keep us from carving off an important body part, we pulled it off. At the onset of the day, I would never have thought I would have been able to do it.
Ole was a much bigger challenge for me.
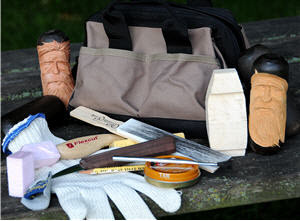
Photo 8. The type of carving I started with doesn't require a lot of tools. I invested in a carving glove after a couple near misses with my knife.
One of the best parts of carving is the minimal amount of tools required to get started. As eager as I was to buy every carving tool I could find, I’m glad fate steered me away from those purchases. As much as I love to buy tools and gadgets for the shop, this new hobby really has very limited requirements. All you need to get started is a single knife, a strop with polishing compound to keep your knife sharp, pencil, and a piece of wood. If you’re a tool junkie, don’t be turned off– there are plenty of opportunities here for new tools and you will undoubtedly get many of them if you spend much time carving, but you only need one knife to start. A carving glove wouldn’t be a bad idea. I didn’t have one and was fortunate not to add any scars to my fingers. I have since purchased a carving glove, (Photo 8) to protect my hand from that occasional miscalculated cut.
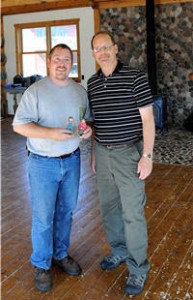
Photo 9.
I’ve had a blast bringing my carvings to life. My experience at the North House Folk School with instructor Bruce Futterer, (Photo 9), was a great one, and helped my carving progress in leaps and bounds.
Photos By Author
Tim Nyberg started his woodworking as a very young boy. He was about 6 when he got his first workbench and toolbox. He moved on and started his power tool collection with a Sears jointer and radial arm at age 16. Throughout high school, Tim took every shop class he could get his hands on, from architectural drafting to woodworking. Tim enjoys turning projects on his mini lathe, carving, and just about any kind of woodworking he can sneak into his schedule.
Tim teaches pen turning classes at the Wild Earth School in Hudson, WI, and has demonstrated tools for Jessem, Bessey, and CMT.


I'm intrp
I want to learn to separate legs. I've been at it for 4 or 5 months, watch a lot of youtube.
Well written story and interesting as well as informative for us beginners.
Tim: An excellent intro to recreational woodcarving north of lake Superior, considered the wild north in Canada. I am just starting woodcarving in south-western Ontario, north of Lake Ontario & Lake Erie. Happy Presidents' Birthday to you & yours! We have a more genteel Family Day Feb. 17 in Ontario! Cheers! Paul
Very 'hard' to whittle. I have been watching many videos on beginning whittling and thought I would give it a try. I purchased a whittling knife, level 5 safety glove and a variety of bass wood. I got all set up, turned on a YouTube video and started to follow the video. The video showed the wood being removed without much force. I tried the same cuts and the wood was very difficult to cut. If I were to whittle any figure my hands would be raw. ?????
Thanks for sharing! I am 60 and just discovered the joys of whittling last September. I am struggling to find patterns and guides beyond wood carvers illustrated and a couple of power carving books. I have just started playing around with power carving and I dont really see many guides around and nothing in Australia about Aus animals!
Great article ! Well written,thank you.
Nice article. Interesting. I am a 3-D art teacher in Az. perusing the internet, wondering about getting my classes started in carving. Wondering about the expense. How much a starter kit costs, best places to get (Bass?) wood. I am noticing very little information about teaching to high school classes. I wonder if it is the expense, the kids not developmentally ready, or the liability of managing all of the knives. I would love to go into carving. Lots of teachers do soap carving, but that sounds pretty boring compared to wood carving. Any hew.....Love the Lena and Ole figures! Any comments would be appreciated! melanie.legendre@guhdsaz.org
I started last winter with a class once a week in Florida. bought lots of Bass wood & started making Shavings Two walking sticks, 5 or 6 minature Santa's Forking on a relief Santa face
Thanks